In this article I’m going to demonstrate some simple tips and tricks which will help you build and maintain beautifully simple mobile build pipelines. These techniques can be applied to different mobile app technologies and integrated into almost any build system:
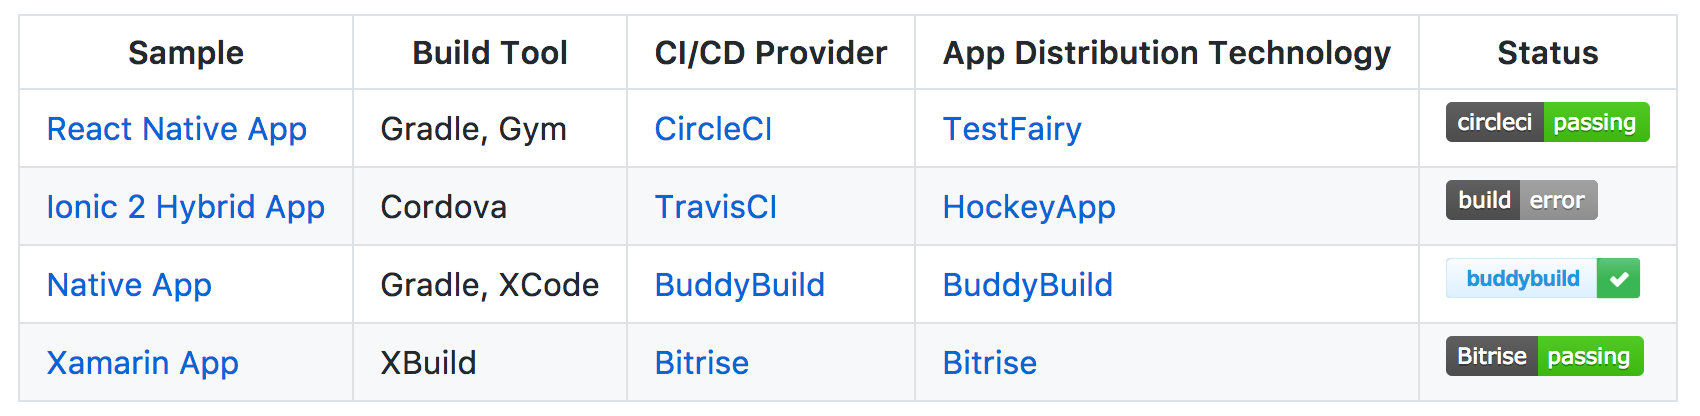
Each tip is demonstrated in the sample apps in the dwmkerr/beautifully-simple-app-ci repo.
- The Challenges of Mobile App CI
- Tip 1 - Embrace Makefiles for Consistency
- Tip 2 - Control Version Numbers with a ‘Touch’ Command
- Tip 3 - Control App Icons with a ‘Label’ Command
- Tip 4 - Support Configurable App Ids
- Tip 5 - Document, Document, Document
- Conclusion
The Challenges of Mobile App CI
Conceptually, a mobile app CI pipeline is pretty simple:
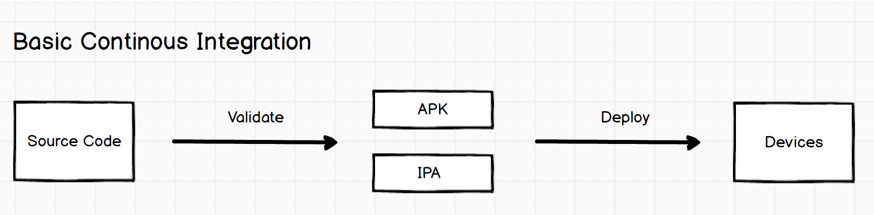
We take our code, perform some kind of validation (such as testing, linting, whatever), generate our artifacts and then deploy them to some devices.
Often though there’s a bit more to it than that:
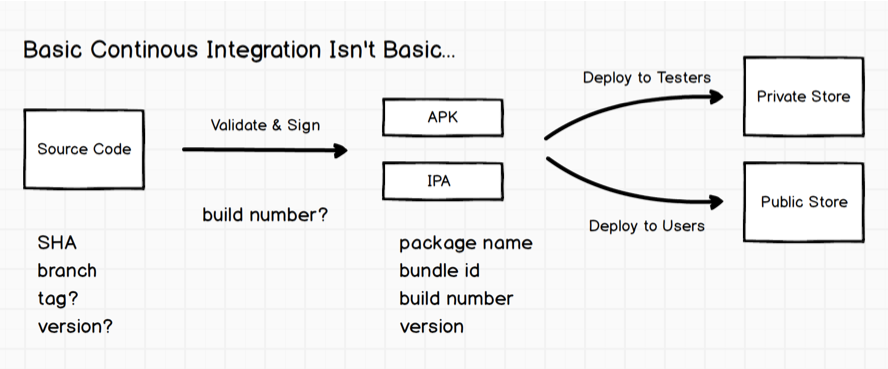
Our source code has some metadata associated with it at the point in time you create your binaries, such as:
- The SHA, which uniquely identifies your exact location in the source history.
- The branch, which may have some semantic meaning for your project, for example
mastermeaning ‘production’ oralphameaning your current unstable public build. - A tag, which may represent something like a semver, or may have more project-specific meaning.
- A version, which might be in something like a
package.jsonor embedded in your project files for iOS or Android.
When we build we have to:
- Think about how we test and validate
- Think about how we sign
- Handle package names and bundle ids, which can cause headaches if you are going to install multiple versions of an app (e.g. dev and UAT builds)
- Consider build numbers and version number
So even the ‘basic’ CI isn’t all that basic. The rest of this article is a set of tips and techniques which I have found useful when developing mobile apps.
Tip 1 - Embrace Makefiles for Consistency
There are a raft of platform and framework specific tools and interfaces we will have to use in mobile projects. XCode, Gradle, NPM, framework specific CLIs, tools such as Fastlane, etc etc.
If you ensure that your main ’entrypoint’ to key operations is a recipe in a makefile, you can provide a degree of consistency to mobile projects. For example:
make build- Creates an IPA and APK, saving them to the./artifactsfolder.make test- Runs all test suites.make deploy- Deploys the binaries.
A makefile for such commands might look like this:
test:
    # Run all the tests.
    npm test

build:
    # Create the apk, copy to artifacts.
    cd android && ./gradlew assembleRelease && cd ..
    cp -f ./android/app/build/outputs/apk/myapp.apk ./artifacts

    # Create the ipa, copy to artifacts.
    cd ./ios; fastlane gym --scheme "app" --codesigning_identity "$(CODE_SIGNING_IDENTITY)"; cd ../;
    cp -f ./ios/myapp.ipa ./artifacts

deploy:
    # Push to TestFairy.
    curl https://app.testfairy.com/api/upload \
        -F api_key='$(API_KEY)' \
        -F "file=@./artifacts/myapp.apk"
This is a slightly shortened snippet, you can see a variety of working examples in the git repo:
github.com/dwmkerr/beautifully-simple-app-ci
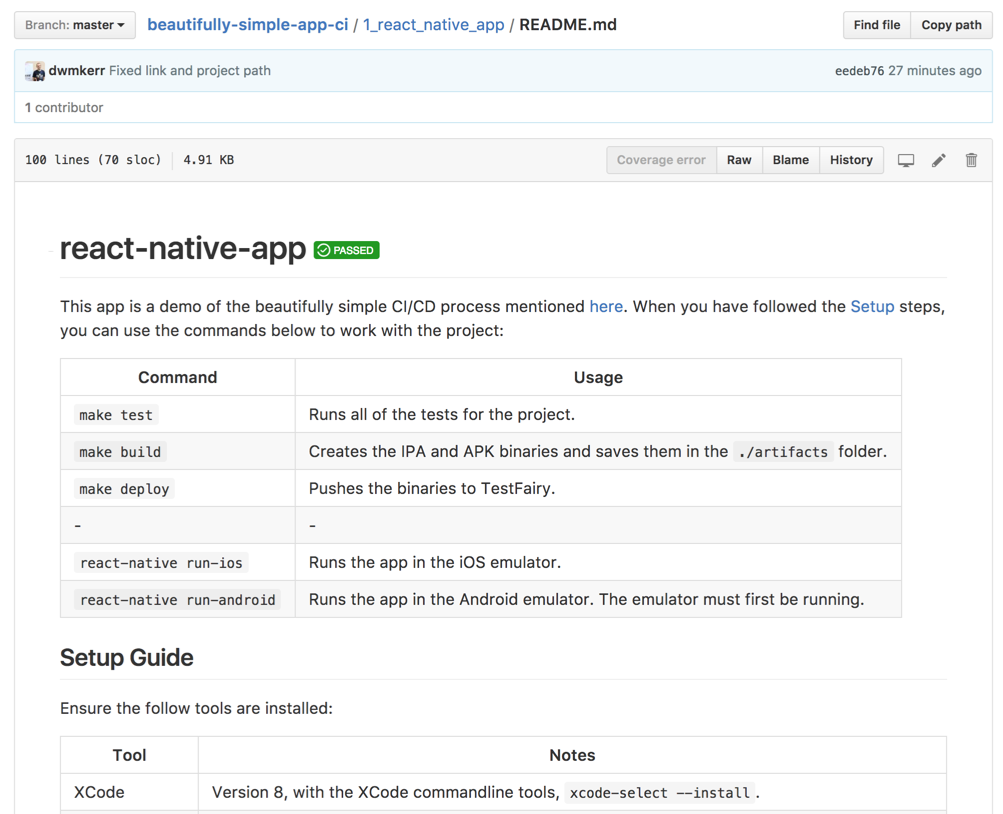
The first sample in the above repo demonstrates using makefiles to handle key commands for a React Native app. In the example, CircleCI is used to handle automatic builds on code changes, and the apps themselves are distributed automatically to testers’ devices with TestFairy.
The nice feature is that the bulk of the logic is in the main repo source, in the makefile - the CI tool simply orchestrates it. Developers can run exactly the same commands on their local machine.
The README.md immediately draws attention to the makefile commands:
The makefiles do most of the work, that makes setting up CircleCI almost trivial. Here’s a snippet of its config:
# Tell Circle where we keep our artifacts.
general:
  artifacts:
    - ./artifacts

# When we test, we build the android app and test it.
test:
  override:
    - make build-android
    - make test

# If there are any changes to the master branch, push a new version
# of the app.
deployment:
  master:
    branch: [master]
    commands:
      - make deploy-android
Our commands are android specific at this stage as Circle don’t support iOS builds on their free plan1. Later samples which use other build systems demonstrate Android and iOS.
The CI automatically tests and builds whenever we have new code commits:
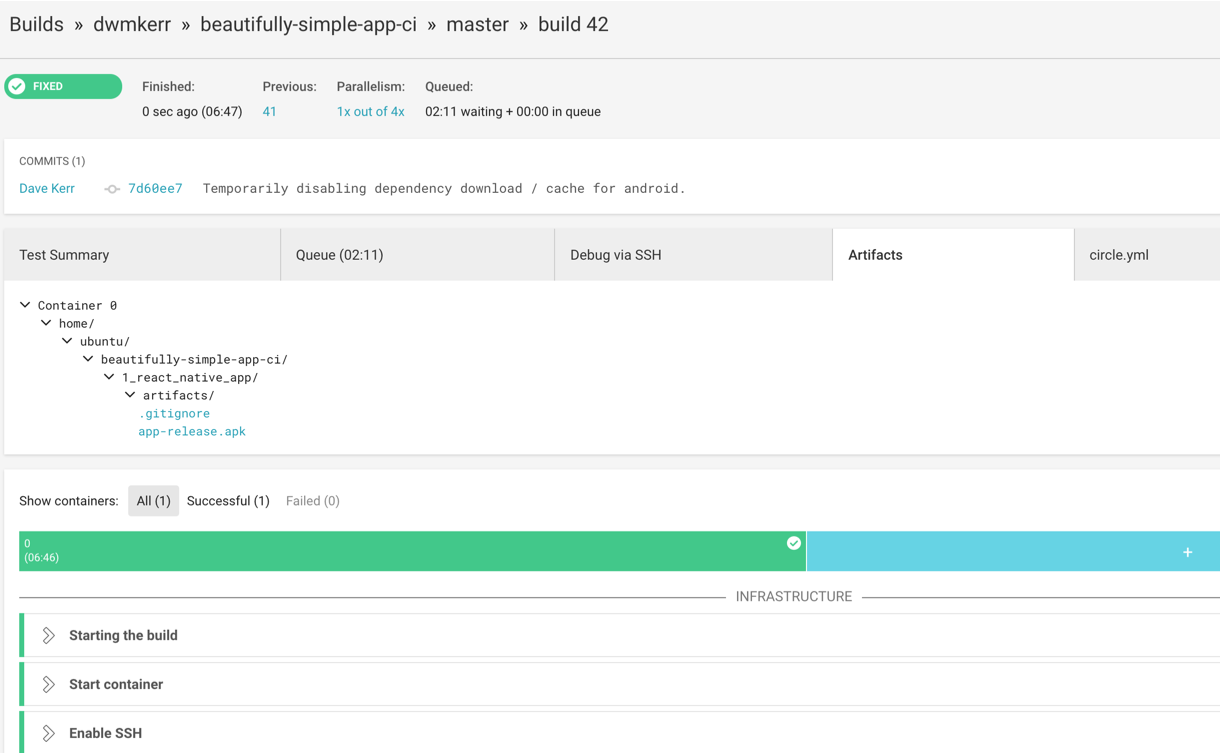
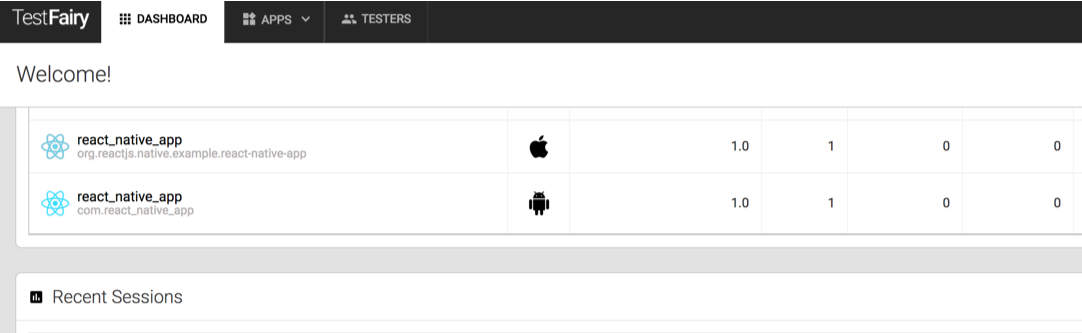
Also, if a commit is made to the master branch, our new app is automatically pushed to TestFairy, which can be configured to automatically update the test team:
Makefile syntax is close enough to shell scripting that simple operations are generally straightforward2 to implement. The approach is also perfectly valid for server side code and almost any project.
Teams with many projects can build consistent patterns and syntax for building. Take a look at the image below:
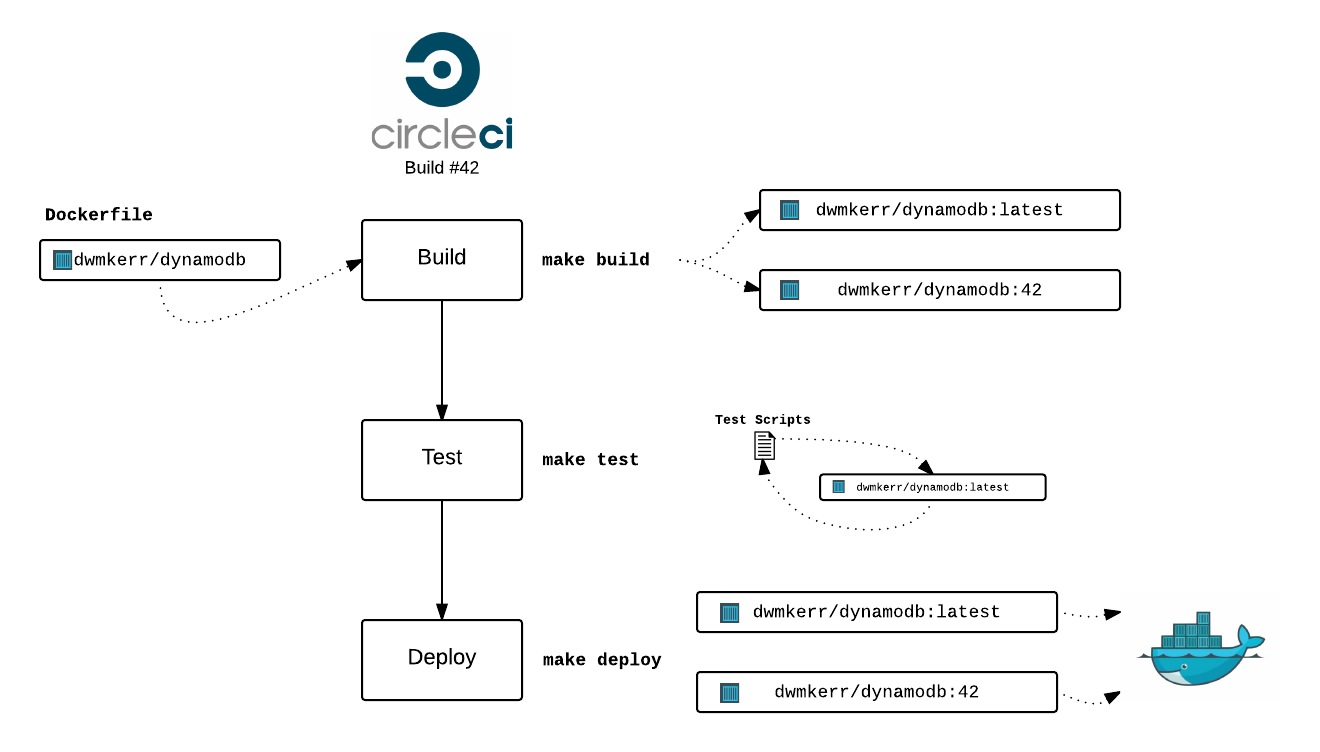
This is from my article on Simple Continuous Integration for Docker Images - where exactly the same principles are applied.
In Summary
- Makefiles allow you to provide an entrypoint for common app CI tasks which is framework and toolkit agnostic
- Being able to run the individual steps of a CI build on a local machine makes it easier for developers to work with the pipeline
- By having a CI platform only need to handle the orchestration of these simple steps, we are less tied to specific platforms and can reduce lock-in
We’ll see more interesting makefile recipes as we get into the other tips.
Tip 2 - Control Version Numbers with a ‘Touch’ command
iOS and Android apps have both a version number and a build number. We might have other files in our project with version numbers too (such as a package.json file).
It can be very useful to have a way of keeping these version numbers in sync. Again, we can use a makefile recipe:
make touch
This command will vary in implementation depending on your platform. For example, this would be all that is needed for a Cordova based project:
# The version in package.json is the 'master' version.
VERSION ?= $(shell cat package.json | jq --raw-output .version)
BUILD_NUM ?= 0

touch:
    $(info "Touching to version $(VERSION) and build number $(BUILD_NUM).")
    sed -i "" -e 's/android-versionCode=\"[0-9]*\"/android-versionCode=\"$(BUILD_NUM)\"/g' ./config.xml
    sed -i "" -e 's/ios-CFBundleVersion=\"[0-9]*\"/ios-CFBundleVersion=\"$(BUILD_NUM)\"/g' ./config.xml
    sed -i "" -e 's/version=\"[.0-9a-zA-Z]*\"/version=\"$(VERSION)"/g' ./config.xml
Notice we don’t really need complex tools for a job like this, sed[^3] is sufficient to quickly make changes to config files.
This works very nicely with build systems, many of which provide a build number as an environment variable. For example, we can add a build number with TravisCI like so:
env:
  - BUILD_NUM=$TRAVIS_BUILD_NUMBER
script:
  - make touch
  - make test
  - make build-android
To go into more detail, we’ll look at the second sample in the git repo, which is a Cordova App. This sample will always set the build number in both apps and the build version to whatever is present in the package.json file. That means you can do things like this:
$ npm version minor                     # Bump the version
v0.1.0
$ BUILD_NUM=3 make build && make deploy # Build and deploy the apps
...
done
And all of the version numbers and build numbers are updated and the apps are deployed. In this example project, they’re deployed to HockeyApp:
This build runs on TravisCI, so only builds the Android version. You can clone the code and build the iOS version (and deploy it) using the makefile.
In Summary
- There will come a point in your project development where you’ll need to handle version numbers, having a command to explicitly deal with this adds rigour to this process
- Build numbers are just as important as version numbers during development, ensuring your CI build number is baked into your artifacts is critical for troubleshooting and control
Tip 3 - Control App Icons with a ‘Label’ Command
When you are working in a larger team, it can be very useful to label your app icon so that team members know exactly what version of the app they are using. This is often the case if you are working in a team where features or bugfixes are being deployed rapidly.
You might label your icons with build numbers, SHAs, branch names, versions, tags, or even something custom such as ‘QA’ or ‘UAT’ for different versions of your app. Here are a few examples:
![]()
I’ve found this to be very useful, so created a command-line tool called ‘app-icon’ to help with the task:
This tool has a label command to add a label, and a generate command to generate icons of all different sizes. This means you can add recipes like this to your makefile:
VERSION ?= $(shell cat package.json | jq --raw-output .version)
BUILD_NUM ?= 0    # This might come from Circle, Travis or Whatever...

label:
    $(info Labeling icon with '$(VERSION)' and '$(BUILD_NUM)'...)
    app-icon label -i base-icon.png -o icon.png --top $(VERSION) --bottom $(BUILD_NUM)
    app-icon generate -i icon.png
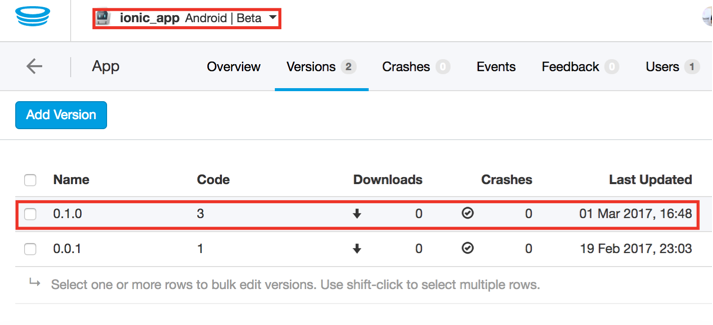
Each sample app labels its icon in a different way:
- The React Native App puts the short Git SHA on the bottom of the icon.
- The Ionic App puts the
package.jsonversion at the top of the icon. - The Native App puts an environment label at the top of the icon, and the build number at the bottom.
- The Xamarin App includes the configurable app environment (this is detailed in the next tip) and build number
There are references to each sample and the associated code in the README.md at:
github.com/dwmkerr/beautifully-simple-app-ci
As a quick example, the Pure Native App runs this code prior to each build:
BUILD_NUM=BUDDYBUILD_BUILD_NUMBER make label
This app uses BuddyBuild as a build system, meaning we can just drop this line in the buddybuild_postclone.sh script. You can see the labeled icons directly in the BuddyBuild UI:
![]()
The Android build is currently having some issues due to fonts being accessible by the labelling tool (which uses ImageMagick under the hood), with any luck this issue will be fixed soon. This seems to be an issue with the BuddyBuild ImageMagick installation rather than the labelling code itself, which is running fine on all of the other builds!
In Summary
- A little bit of time invested in managing your app icon can potentially save many hours if you are rapidly iterating on apps
- The
app-icontool can help you quickly label and generate icons
Tip 4 - Support Configurable App Ids
Another trick I’ve found useful is to have a command which automatically updates your iOS Bundle ID or Android Application ID. This can be handy when you have multiple versions of an app (such as a QA build, dev build, UAT build or whatever).
If you have users who need to have different versions of your app on their phones then this is actually a necessary step (at least for iOS), as you cannot have multiple versions of an app with the same ID installed.
Often, I will aim to have a standard ‘base id’, such as:
com.dwmkerr.myapp
and then simply append whatever the ‘flavour’ of my app is to the end of the id:
com.dwmkerr.myapp_qa      # The QA build...
com.dwmkerr.myapp_uat     # The UAT build...
The base id is then reserved for the master build, which is what goes into production.
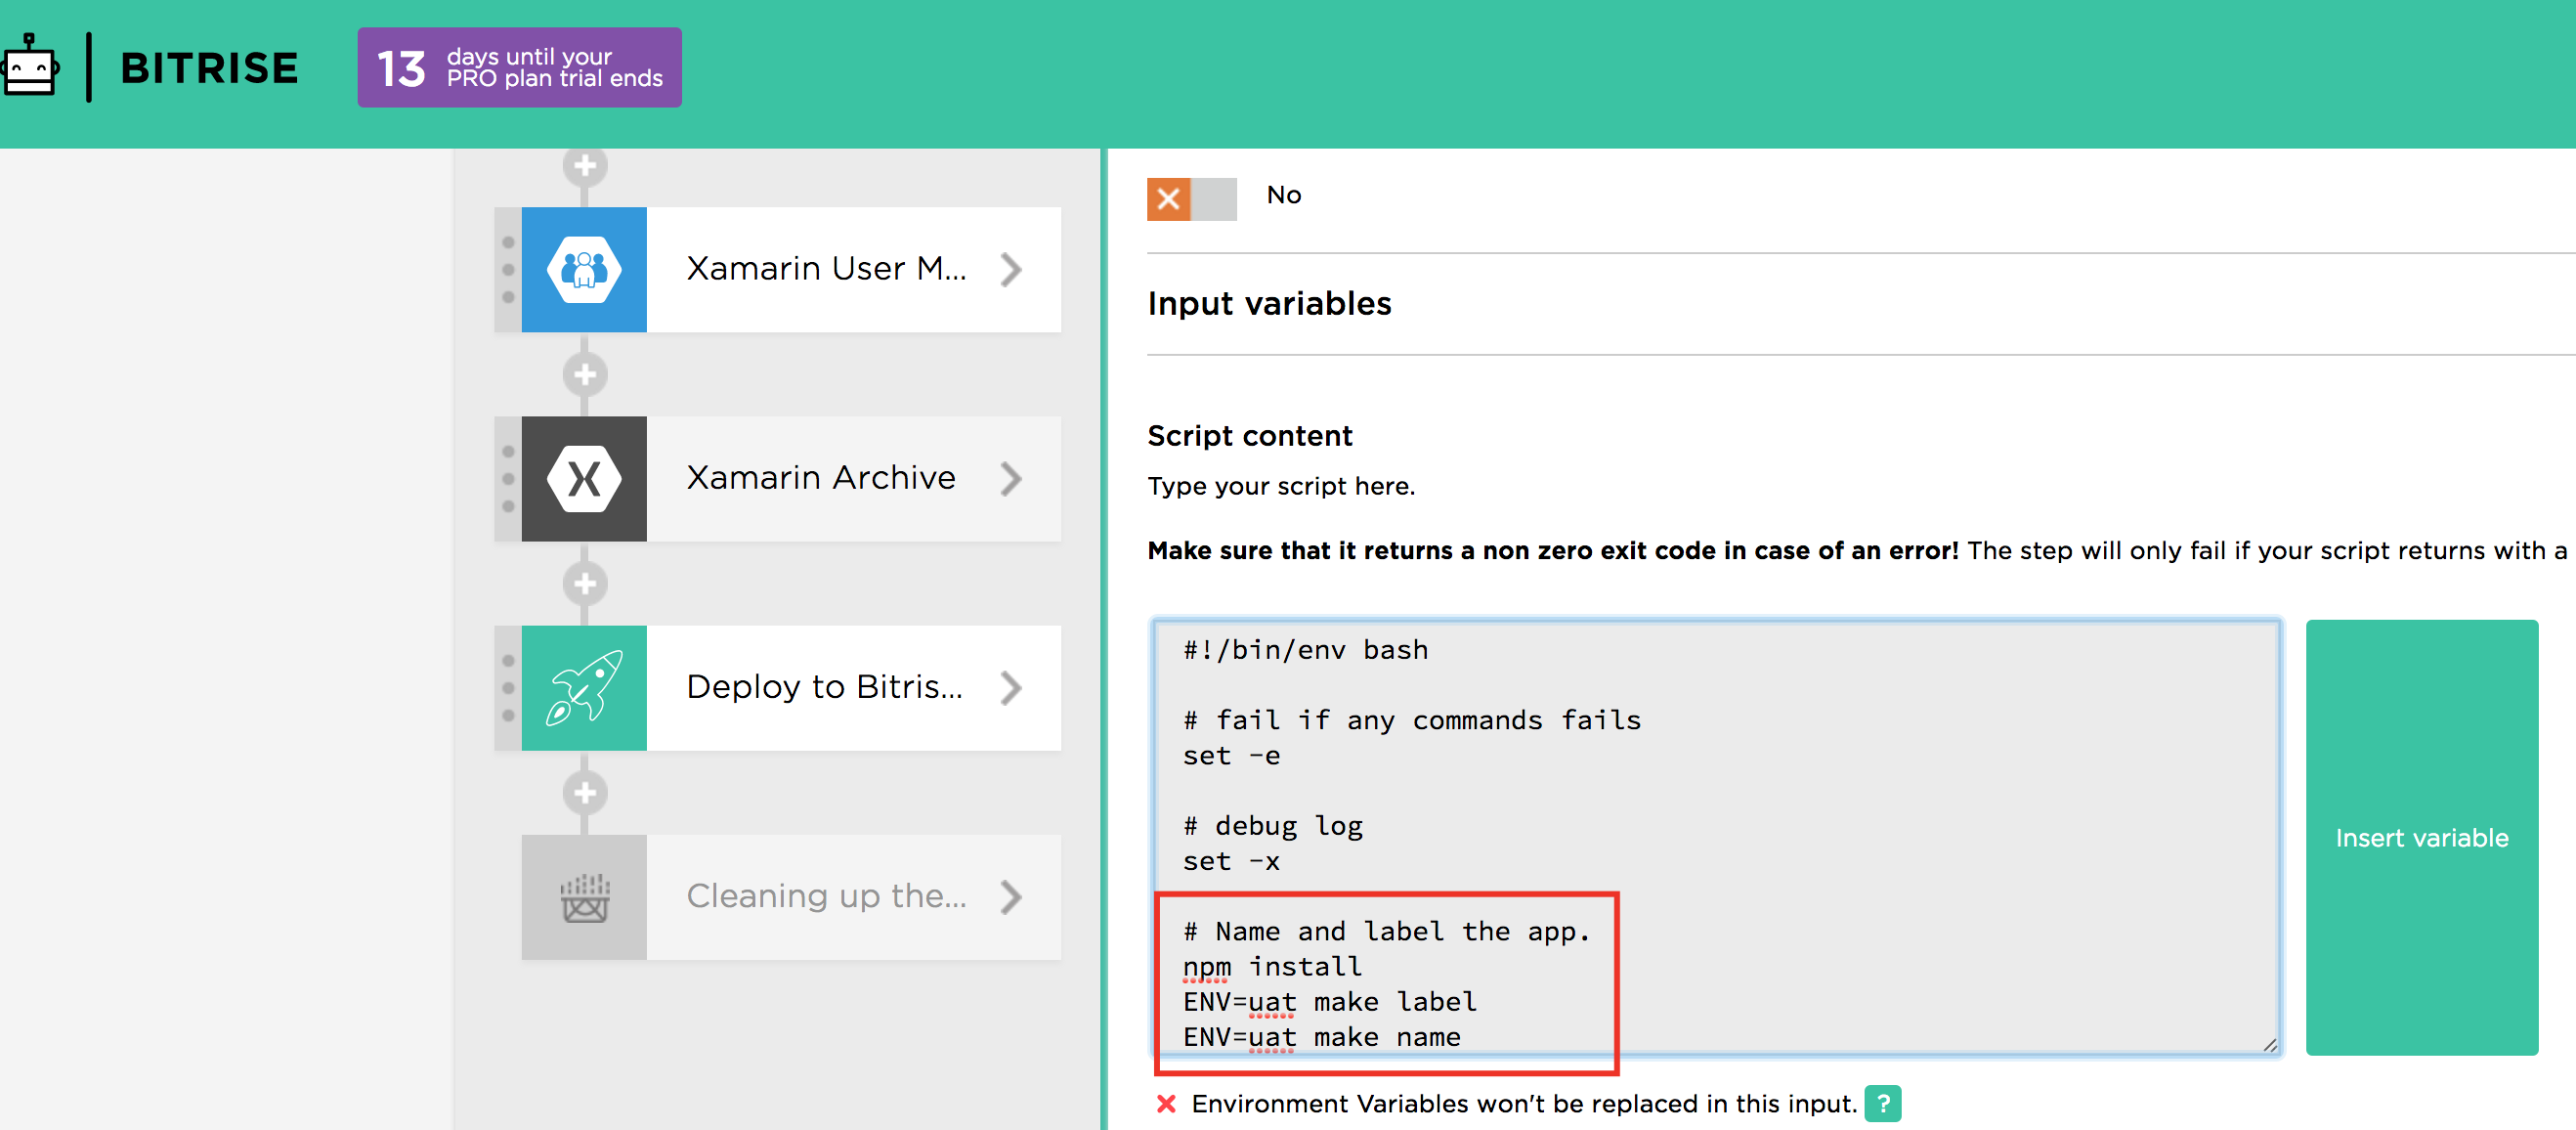
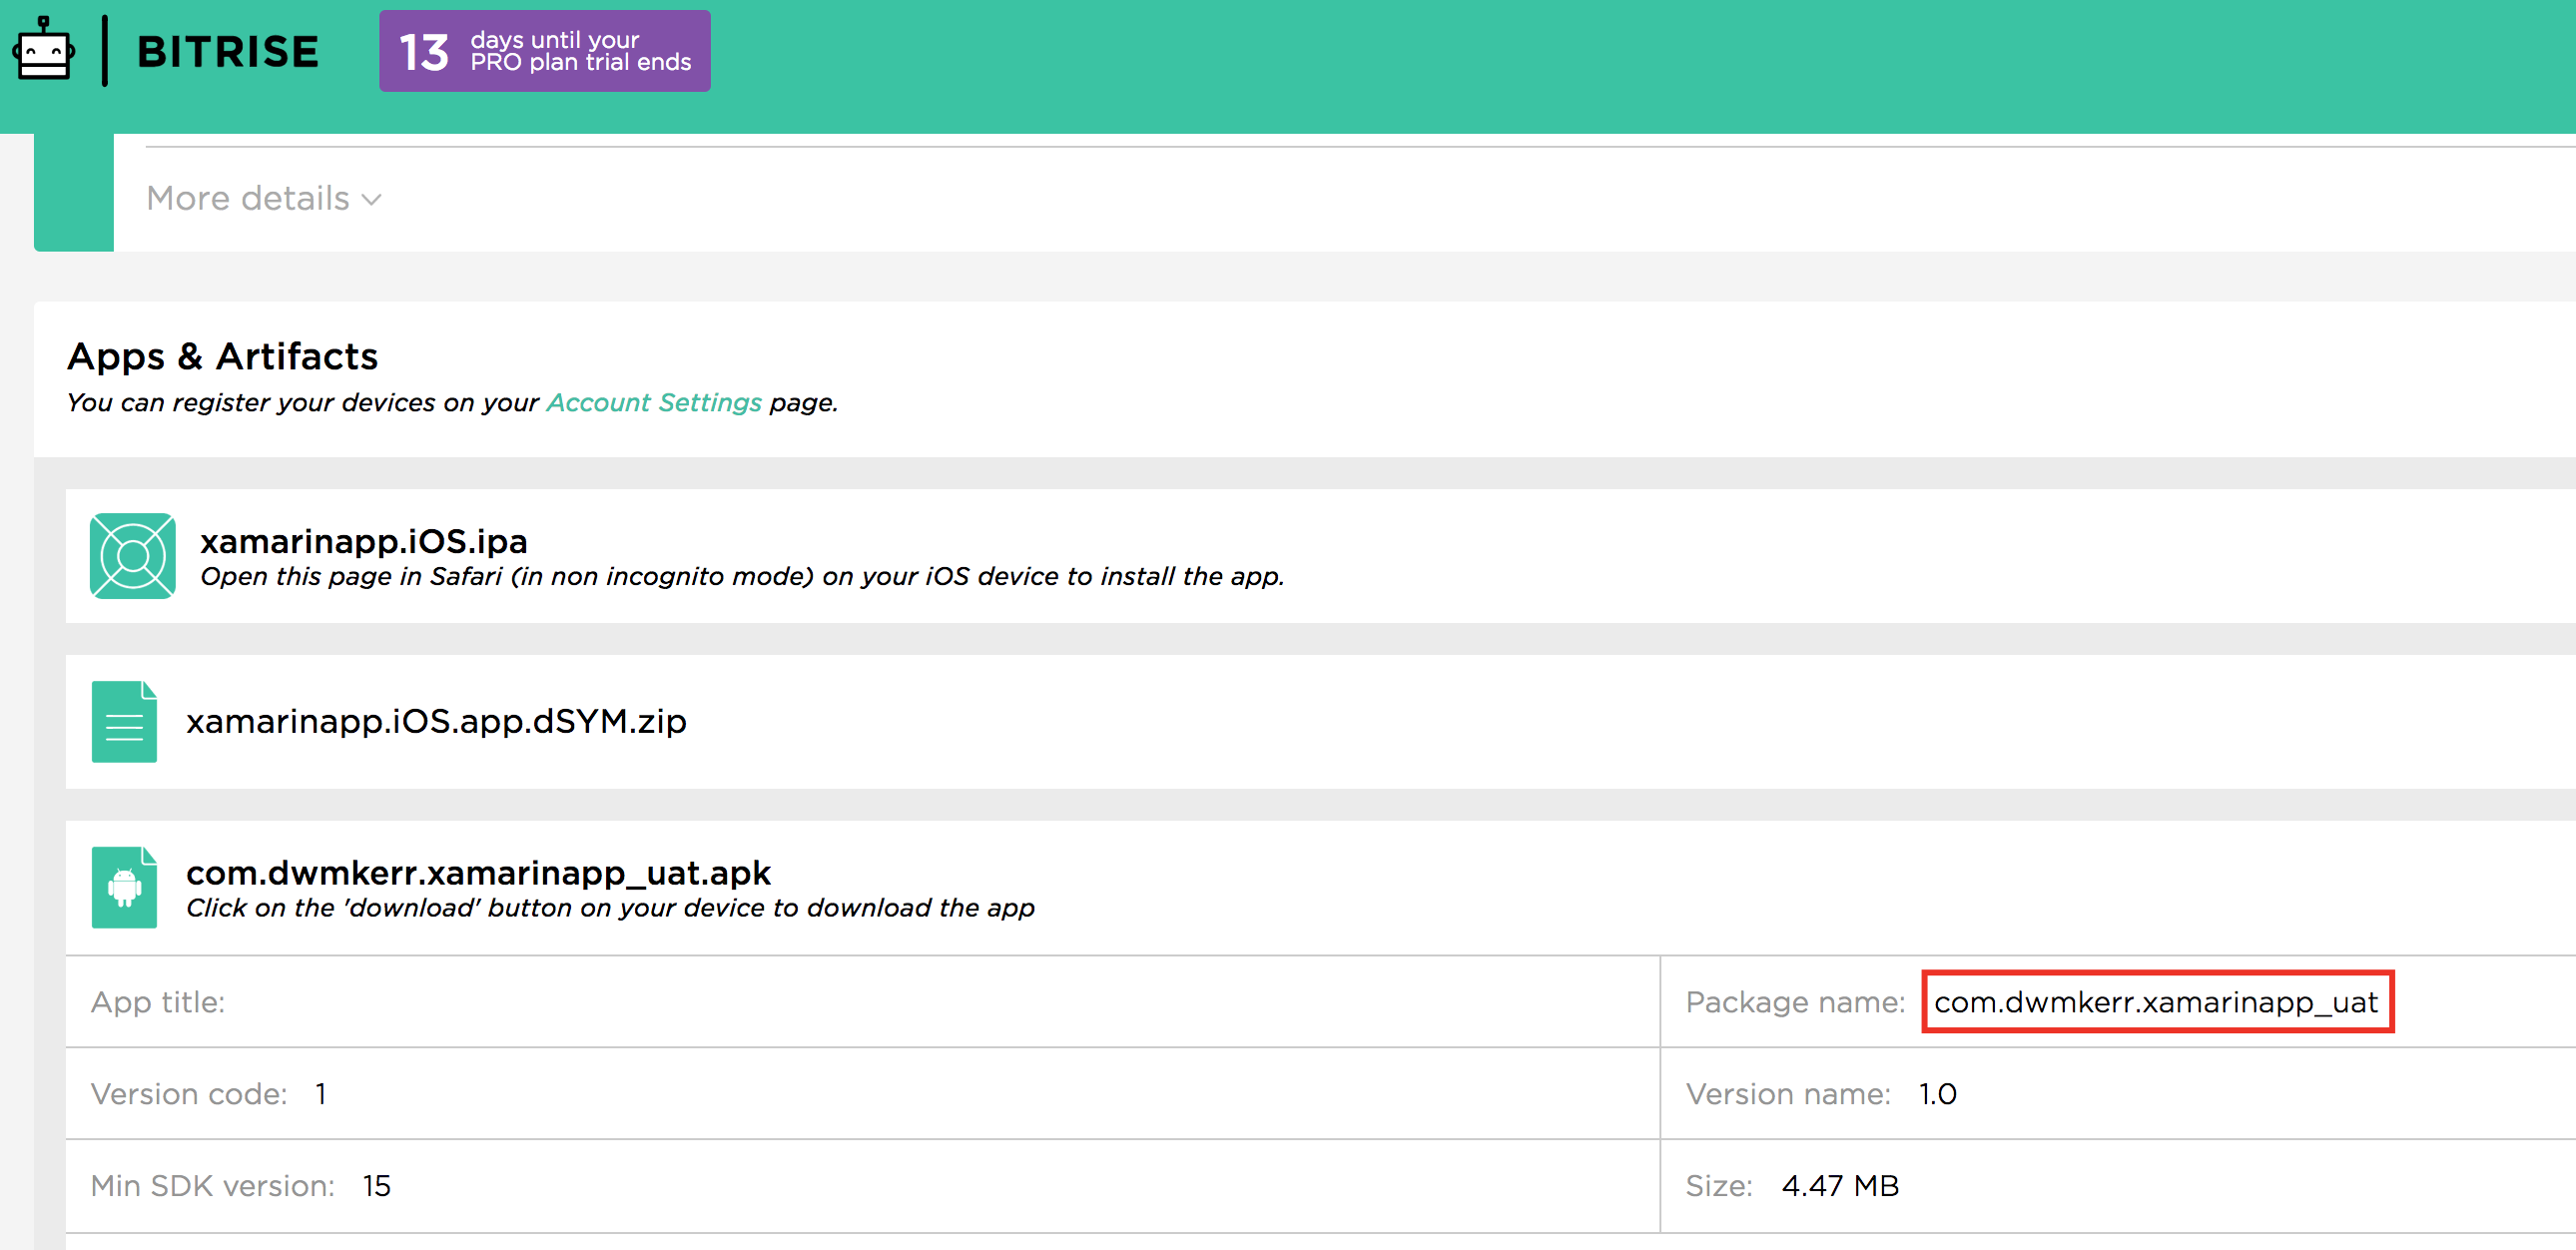
Just like with all of the other tricks, I tend to use a recipe in the makefile to do the heavy lifting, and then leave the build system to orchestrate the commands (we’ll see more of this later). Here’s how a recipe will typically look (this comes from the fourth sample, which is a Xamarin App):
ENV ?= production

# Set the app id, with the 'production' environment implying the unaltered 'base' id.
ifeq ($(ENV),production)
	APP_ID=com.dwmkerr.xamarinapp
else
	APP_ID=com.dwmkerr.xamarinapp_$(ENV)
endif

name:
	$(info Naming app '$(APP_ID)'...)
	sed -i.bak 's/com.dwmkerr.xamarinapp.*</$(APP_ID)</' iOS/Info.plist
	sed -i.bak 's/com.dwmkerr.xamarinapp.*\"/$(APP_ID)\"/' Droid/Properties/AndroidManifest.xml
This small recipe can be very useful in combination with other techniques. Ensuring your build respects the ENV variable (or whatever you name your ‘flavour’) means that you can have different configurations for different environments, build multiple versions of the app, each with a distinct app icon, and distribute them to your team.
In the screenshots below, you can see how the presence of the ENV environment variable automatically updates the App ID (this is taken from the Xamarin Sample, which orchestrates builds with Bitrise2:
In Summary
- Configurable App Ids allow you to maintain isolated builds of your app for specific environments, even on the same physical device
- This tip must be used with caution, some features (such as iOS push notifications) will not work if the bundle id is changed (it can also cause issues if your provisioning profile does not use a wildcard)
Tip 5 - Document, Document, Document
Even teams which are great at documenting complex application code can sometimes be a bit lax when it comes to documenting build related code.
Unfortunately, build related code will often need more documentation than usual. Why is this?
- It is often complex (spend any time working with the XCode commandline or provisioning profiles and you’ll likely agree)
- It is rarely changed (often worked on heavily at the early stages of a project then not touched)
- It is critical (when it breaks, teams are often blocked)
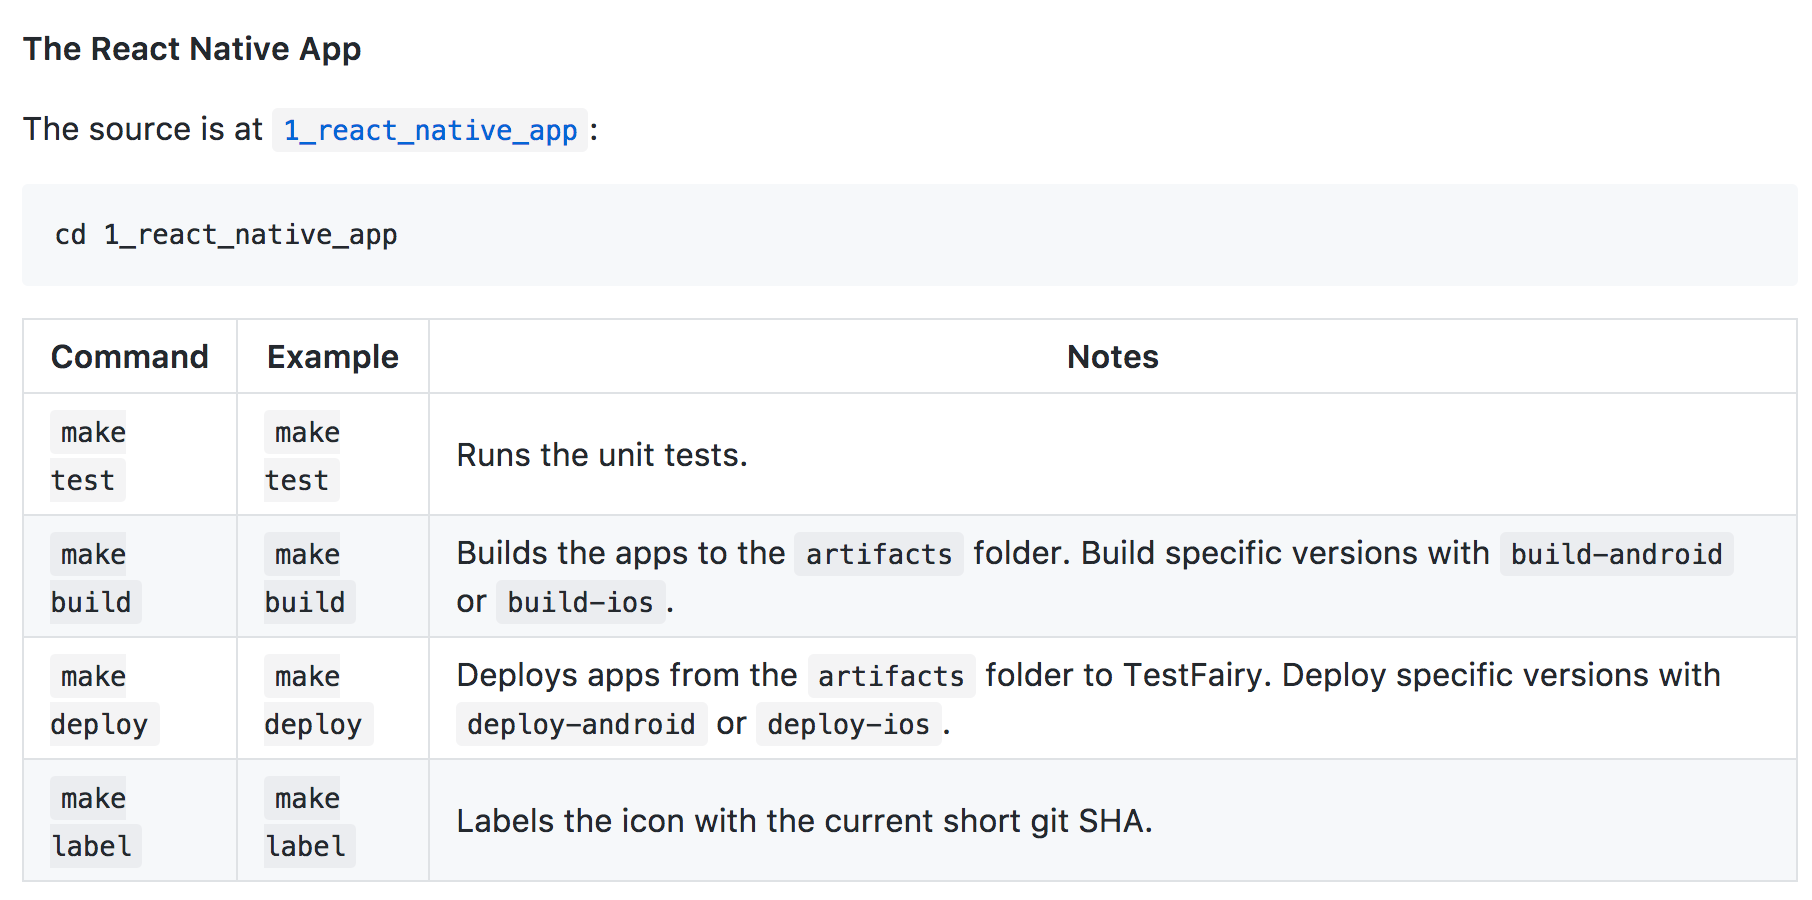
When something goes wrong with a build process, or needs to be changed, it is a real pain when only one person knows how the code works. Be rigorous with this code, make sure it is documented and reviewed, and share the knowledge around your team. I tend to like to have a table of commands as a quick index in the README.md file, and then heavily comment the code itself:
In Summary
- Be rigorous with documentation, when things go wrong with CI code then people are often blocked
Conclusion
Most of these tips are fairly explicit, there are detailed examples in the sample project. Familiarity with these patterns and techniques can be useful, but perhaps the most valuable takeaway would be to embrace the following principles:
- Developers should be able to run all of the key CI steps on their local machine, to be able to understand, adapt and improve the process
- When building more complex features, we should create small, simple units of work which can be composed into larger pipelines
- Complexity, if needed, should be in in code - not in ‘black box’ CI tools (such as esoteric features for specific CI providers or Jenkins plugins). For example, CircleCI offers a Git Short SHA environment variable - but you can grab a short SHA with
git log -1 --format="%h", and the second approach works anywhere - Use CI platforms to orchestrate work, use makefiles and scripts to handle logic
I hope this article has been useful, any thoughts or comments are always welcome!
Footnotes
I have successfully used this approach to build Android and iOS from the same OSX build agent on their paid plan on a number of projects. The most straightforward way to do this is to have a single build run on OSX and create the Android app as well as the iOS app. ↩︎
Perhaps straightforward is an overstatement, but getting those who are familiar with shell scripting will have few difficulties. Those who are not will find a learning curve, but it is very useful to at least get the basics of shell scripting learnt. ↩︎ ↩︎